 This blog post is dedicated to Paul Anater, at Kitchen and Residential Design. Paul is an online kitchen design mentor for me, as well as a fabulous baker. One of the recipes he posted awhile back is for a homemade sourdough french bread. I decided to give this recipe a try, as I was attending a French dinner and wanted to make my own bread for my French Onion soup (from Julia Child).
Recipe
You can find the recipe on Paul's blog here.
Kitchen Features Used:
- lowered height baking counter
- "proof" setting on my GE Monogram ZET1 oven
- rolling racks of same ZET1 oven
Result:
The bread was GREAT fresh out of the oven, and everyone in my family loved it. I have never made a bread by hand before. (In fact, I had to google how to knead bread!) Yet, this recipe was sooo easy. Is all baking this easy? I would have to guess "no."
This is definitely a dense french bread. I know some like a lighter, holier french bread. This bread was almost perfect for me. I like a thick dense crumb for my baguettes.
I felt my kitchen appliances and layout performed well for this recipe. The main snag is that I haven't organized my kitchen yet, to put all baking supplies in my baking area. (I realize this is ridiculous given that I have a designated baking area.) I also do not have a water source in my baking area, so that required lots of steps. Not a big deal.
The Process:
 1. Make your sourdough starter the night before, and let it sit overnight
 2. The next day, about 4 hours before you want the bread out of the oven, add water to the starter and break it up.
 3. Add dry ingredients, fold it all in and mix.
 4. Turn shaggy dough onto floured counter.
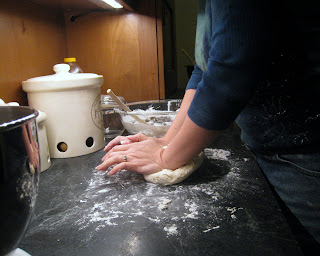
 5. Knead for 10 minutes.
Kitchen note: I put a lowered baking counter in my pantry, but honestly my initial motivation was for the look and feel of it. I love the cozy statement of a lowered baking counter. I have never, however, kneaded bread (see above), and rolling out a single pizza crust or pie crust is not so labor intensive that a lowered counter is imperative. Let me tell you though, if you are going to knead firm elastic bread dough for 10 minutes, you NEED that lowered baking counter! It really helps if you lean into it, which is much easier with a lowered counter. My baking counter is 32" high.
 6. Let the dough rise about 2 hours until doubled in size.
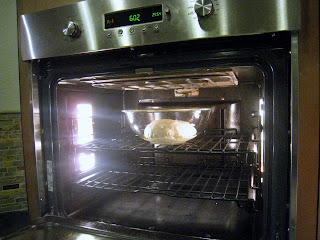
Kitchen note: After letting the dough rise, I felt it hadn't doubled in size per Paul's directions, despite my selecting a warm area. So, I popped it in my oven on the "proof" setting. This is a very very low heat, basically the equivalent of a light bulb. I could have just used a warm area in my kitchen, but it was definitely handy to have the dough bowl off the counter and out of the way. I must admit I have proofed dough before, in other kitchens, by turning on my oven light and putting the dough bowl in the oven. The "proof" setting on my oven is just a fancy way of doing the same thing. But hey, it's there, so I used it. Of course, you keep the oven door closed for proofing (this door is open just for photo taking, and then it was closed). You can see the "Prf" in orange letters on the upper left of the oven display, which is the confirmation that I have selected the Proof setting on my oven.
 7. Setup your "steam oven" by setting a pan of water on a bottom rack during preheat.
Kitchen note: At this point, I was very glad to have rolling full-extension racks. I didn't have to carefully slide a sticky oven rack, loaded with a big water pan, back into the oven, worried that it would spill or generally slosh all about. I just pulled out my rack, set the pan on it, filled it with water, and then rolled it back into place. The rack rolls on ball bearings so the smooth ride ensured a spill-free result. These full extension racks are really nice in many places, but this is the first time using my kitchen I felt explicitly pleased to have this feature.
 8. While the oven preheats, punch down your dough
  9. Shape it into a long thin loaf (about 3" diameter) and let it rise another half hour.
 10. Bake for half an hour. Take it out and admire bread made with your own two hands.
 11. Pretend to let it "cool down." Slice and serve!

7 comments:
My mouth is watering
The loaf looks great. Have you tried Bittman's no-knead bread? Even easier. :)
I'm thrilled that you had such a great result with your first at-bat. Welcome to the world of bread baking. Half the appeal of baking my own bread comes from the act of kneading the dough I have to say. It touches something really primal in me.
I agree with the need for a lowered counter to pull this off effectively. I use my kitchen table (it's 31" AFF) and using my counters would really stink. Those couple of inches save my back every time!
Here's to many more loaves coming out of your kitchen and now that you can handle the basics, start playing around with it to make it your own. That's the real best part of baking.
I have not tried the no-knead bread yet. I have heard great things about it though. To me, no-knead bread means using my bread machine. :)
Oh, how I envy your low counter and rolling oven racks for EXACTLY the reasons you state...I want my whole kitchen lowered 2-3 inches.
There's a neat rustic bread I've made which rises for 24 hours and bakes in a Dutch oven--quite good and very easy!
I've used my Proof function on my oven for homemade yogurt :)
I am imagining myself eating a big slab of that slathered in butter, yum yum! I'm sure it doesn't even need butter, but why I'm fantasizing I might as well go for the full effect, LOL.
Have you made English muffins before? I came across a multi-grain English muffin recipe (no, I have no plans on making them), and when I read it I thought that would be the perfect recipe to marry your foray into baking and Jay's griddle!
I have never made English muffins before. Perhaps I should :)
Post a Comment